Showing posts with label apps. Show all posts

Sunday, January 4, 2015

Playful parenting: Sesame Street Family Play


In my search for resources that for support playful parenting, I came across the app, Sesame Street Family Play.  The app is $.99 with an additional in app purchase.  According to the description of the app, it is designed to encourage everyday playful moments and includes 150 game ideas. The $.99 version of the app provides game ideas for the home.  The in app purchase is $1.99 and provides additional activities for when away from home and traveling. 

The app prompts the user to choose the area of the house where the play will take place, then asks how many kids will be playing.  Choices for locations are Living Room, Kitchen, Bathroom and Bedroom.  Options for players are from 1-4+.  Different Sesame characters present games using readily available materials in the chosen area of the home. Sock Skee Ball is a game that was generated when the bedroom was chosen as the location.  The app asked if there were several belts and socks available.  To play the game, rolled up socks are thrown into looped belts that are placed on the floor.  Each loop is assigned a different point value.   At the end of the activity, the app describes what type of skills the activity is promoting.  In this case, the app explains that Sock Skee Ball promotes spatial relations, counting, and addition.  There were games for different routines such as clean up, bedtime, and bath time.  An example of a clean up game is, Cup Handed Robots.  The idea of the game is to see how fast you can pick up things with plastic cups on your hands.  A novel way to get reluctant cleaners engaged in the process. 


The home version of this app is a great tool for a parent or caregiver to turn to when a new play idea is needed.  The developers have designed many appropriate activities that promote imaginary and active play.  

Wednesday, February 19, 2014

Engaging apps for Scribbling and Drawing

Today I am highlighting 2 apps that I would recommend to pediatric Occupational Therapists, parents and teachers of young children, and early intervention providers.  Lazoo offers two apps (currently free) that will get your most reluctant drawers and scribblers motivated to join in the fun. The apps are so engaging, I found myself wanting to try out each scene, looking forward to the animation on each page. The developers were creative in giving a purpose to the doodles and scribbles.

There is a parent section available, which as you know, earns an app bonus points in my book.  The parent section encourages parents to let their child engage in open ended play.  Parents are encouraged to comment on the drawings and examples of questions that can spark some conversations are provided.  Collaboration, creativity, and the process are emphasized.  Here is a quick description of each app.

Let's Color
The app offers over 25 different scenes.  Each scene has a written question or prompt that is read aloud as each word is highlighted.  For the example below the prompt is "These kids are playing in the mud, make it messy!".  The prompt is only read once and there does not appear to be a way to have it repeated.  There are 5 tools available to produce the drawings and there are also stickers for added embellishment. Once the masterpiece is created, the child hits the "GO!" button and watches as her artwork becomes part of the animation. Several of the scenes promote collaboration and imitation by providing more than one image so a parent, teacher or peer can work on one and the child can work on the other.  For example, in one scene the child is prompted to draw hair on a figure and there are 2 figures.

Completed picture from Lazoo's Let's Color app.

Squiggles!

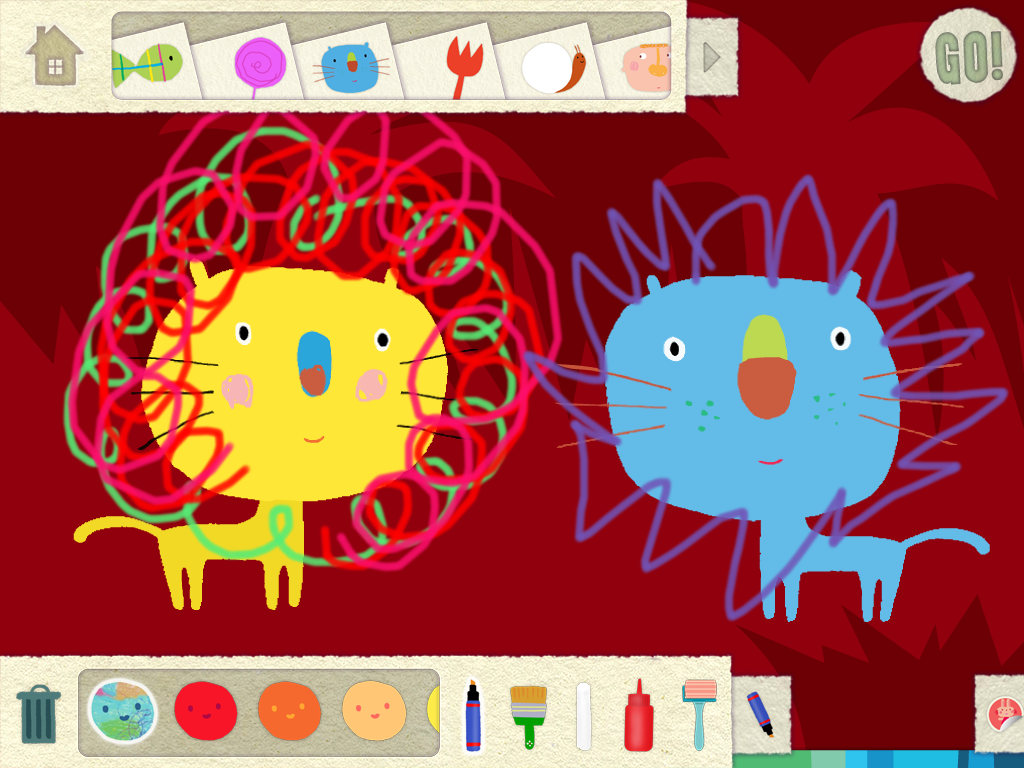
This app has several features in common with Let's Color. A friendly voice provides a prompt such as "Draw a squiggly mane to turn this kitty into a lion." In some scenes there is more than one image so a team can collaborate and imitate. The tools and the stickers are the same.  This app is different in that it provides a prompt in the form of a model of producing squiggles in the intended area and there are fewer scenes.

Completed picture from Lazoo's Squiggles! app
Give these apps a try and enjoy the process!


Sunday, January 26, 2014

Snowballs, embroidery hoops and the app, Faces iMake


Blizzard conditions, low of -19 degrees tomorrow morning, school closed tomorrow, likely late or closed on Tuesday, our crazy winter continues.  Perfect conditions for another winter related post.  Snowballs by Lois Ehlert is a favorite winter read for preschool teachers.  In this post, I share a few extension activities.

A traditional follow up activity to the book is an art project where children use various materials to create a collage of a snow creature similar to the book.  I loved displaying these creations, each one so unique and reflecting each student's ideas and personality.  I wanted to extend this activity by using loose parts that can be arranged and rearranged at a center. During a family gathering, my nephews and neice scoured the kitchen, junk drawer, art cabinet, toy box and yard for materials, added a few embroidery hoops and white paper, then went to work.  Different sizes of hoops were used so size concepts were discussed.  Following the theme of the book, the kids created snow moms, snow dads, snow babies and snow animals.  We took pictures of each creation and planned to create a digital book, retelling the story, but we didn't get that done.  It was acutally nice out so we went outside and played in the snow instead!


The second extension involves a "go to App" on my iPad, Faces iMake.  It is a great creative outlet and is a perfect match for the Snowballs theme.  Kids can create snow people and snow animals using a variety of vocabulary building props available on the app.  The app can be customized by using the camera option.  Pictures can be imported from the camera roll or taken with the camera.  Using a pencil eraser, the object can be cropped from the background and used in the collage. It is easy to resize and rotate objects, and objects can be locked and moved to the front or back.  Once again, the children can take pictures of their creations to share with others.  I enjoyed the video tutorials available on the app as well.  This app offers great features for the price and promotes creativity and vocabulary building.  For those of you in my region, stay warm, stay safe and think Spring!


Monday, August 19, 2013

Story retelling with Explain Everything app


Story retelling is a key strategy in promoting early literacy skills in young learners.  Story retelling supports language development, increased comprehension and encourages a deeper understanding of the language structure of books.  It provides opportunities to practice sequencing and use new vocabulary.  Research suggests that story retelling is more effective than teacher questioning in increasing comprehension.  The Minnesota Early Childhood Indicators of Progress include two related indicators, retelling information from a story and representing stories told or read aloud through various media during play.  

There are various strategies for story retelling.  Using props or toys related to the story, using sequencing cards, role playing and acting out stories are some of the strategies that are effective.  This post highlights the use of an app as another strategy for retelling stories.  The app is Explain Everything and it is one of the apps I think every teacher should have on the iPad.  It is versatile, easy to use and affordable.  It is my "go to" whiteboard app because of one particular tool, the free select cropping tool.  This tool essentially allows you to create stickers/props that can be manipulated to retell the story.  Think of it as technology’s version of flannelboard stories or tongue depressor props and the best part is the animated video can be shared with others.    

Here is a quick explanation of the process I used.   I went to the site, Kizclub to get the visuals.  Under "Stories and Props" there are visuals for many of my favorite books.  I saved the PDF’s to Dropbox in a shared file folder so that other teachers can access them.  I reviewed the PDF guide for Explain Everything and went to work.  Here is a link to the PDF guide for your reference. In order to use the free select tool I took screenshots of each page of the PDF so I could edit the photo.   I took a screenshot by pressing the home button and power button at the same time. I opened a new presentation in Explain Everything.  


I selected the insert image icon and chose “Existing Photo/Video”.  I found the screenshot in the camera roll and selected it.  Next, I chose the free select tool and outlined the image I wanted and selected done.  I repeated this process until I had  all of the props on the slide.  In the example, I created a second slide with the images of the characters in “wake up” mode.  


The next step is to record the child retelling the story and manipulating the props.  The finished product can be sent to You Tube for sharing or can be viewed on the iPad.  

Here is the example using the Napping House props.  I read the story with Olivia and then we went through the book again and looked at the pictures more closely.  I had printed out the props and taped them onto blocks.  She stacked the blocks in the order of the story as I retold the story without the book.  I presented the app and told her that it was her turn to tell the story.  She was somewhat shy about being recorded so I provided some support and prompting.   


In this second example, we personalized the experience.  I took a picture of Olivia in a sleeping position and we removed Granny and put Olivia in the story.  She asked me to tell the story, so I did, but she couldn’t resist joining in, it is a great example of how technology can be socially engaging and promote cooperation and interaction.  She liked this version of the story even more! Next time I would have her draw a house and a bed with the drawing tool.  What story are you going to try?  

Tuesday, April 23, 2013

Creating Instructional Materials with Tiny Tap


Tiny Tap is an app that can be used by therapists, teachers and parents to create instructional materials for targeted practice of a variety of skills.  Users can create a game based page or book using photos or drawings.  Photos can be taken with the iPad camera or imported from the camera roll.  Also, drawings can be created within the app using drawing tools and stickers.   I created the picture scene below with the app, Felt Board.  I took a picture of the completed scene which was then saved to my camera roll.
The app is very user friendly but I will provide a few tips that might keep you from getting stuck.  Using this picture, I recorded my first question/statement: "Let's play a guessing game, I am thinking of an animal, it has whiskers, pointed ears and says Meow".  After recording the statement or question, you are prompted to trace around the correct answer.  When done tracing, tap on the question you finished and you will see a menu like the one pictured below.  


From this menu you can customize the experience by providing individualized feedback for the student.  You can add a response for the correct answer such as, "yes, you found the cat, it has whiskers, pointy ears and says, meow".  You can also add a response for the incorrect answer such as, "oops, that is not the cat, try again".  If you don't customize these responses, the app inserts various sound effects such as laughing, cheering and a buzzer noise.  Another helpful tip I can provide is related to the background music.  The music made it difficult to hear the prompts and it could be distracting for some students.  You have the option of turning off the music.  When you are on the screen pictured below, tap the cassette tape icon in the upper right hand corner, scroll down and select, "no music".  
Here is an example of a page I created using the app, Strip Designer.  I imported this photo into Tiny Tap and asked questions related to functions of the objects.  

Tiny Tap provides some supports to the learners during game play that can be helpful for learners with special needs.  If the student picks the wrong object several times in a row, the correct object is highlighted and the prompt is repeated.  There is also a replay button that can be selected and the prompt will be repeated.  The drawback of this app is the sharing options.  Games can only be shared through Facebook.  It would be nice to be able to share games with other Tiny Tap users via email.  

Tiny Tap has many possibilities for supporting learners who need targeted practice of skills.  Tha app could be used to target language objectives, ELL related objectives, math concepts, and of course literacy objectives.  Although I have not tried it, the app seems like it would be simple enough for a young learner to use with some support from an adult.  I would like to try having a student take a picture of a scene, create a game by giving clues and have other students play the game he or she created.  Has anyone had young learners create a game or book using this app?  How did it go? 


Saturday, February 9, 2013

Getting the most educational benefit out of videos


In two short weeks, I will be part of a great day, filled with sharing of resources and knowledge at a Tech Fair for Young Children.  The event is hosted by a local Early Childhood Family Education program.  The goal of the event is to empower parents, caregivers, and educators of young children to make informed, developmentally appropriate decisions related to the use of technology with young children.  I am providing three different sessions, one of these is on the use of video with young children.  This post summarizes the first part of our discussion on how video can be educational and what adult’s can do to maximize the impact on learning.  

Why use video with young children?
Video is engaging and attractive to young children.  Videos can provide experiences a child might not otherwise have.  If a child is asking what the inside of a bee hive looks like, a hands on experience may not be available but you might be able to find a fascinating video of the inside of a bee hive.  You could explain what you know about bee hives, but with video they can hear it and see it, much more powerful.  Educators can use video to expand content and flatten the classroom walls. Another opportunity videos offer is a novel way to provide needed repetition of some skills that require it.  

Some child development experts worry that when children are watching videos, they are not engaging in activities that we know are good for their development such as playing, engaging in physical activities, or playing outside.  Intention and balance are the key.  Mindful, informed, developmentally appropriate use of video can support and encourage all of these other things we know are good for children.  Watching a video of the bee hive might encourage a child to go outside and count how many bees he can find in the garden or lead to a cooking activity with honey.  Video will be much more educationally rich when combined with "unplugged" developmentally appropriate activities to help the learning stick.  Here are some tips and strategies for getting the most educational bang out of videos.  

1. Follow the child's lead.  Why do pigs like mud?  Do baby kangaroos really live in a pouch?  Children ask so many wonderful questions.  These questions lead to teachable moments and are opportunities for you to spark that sense of wonder and inquiry.  You can answer by saying, "let's find out" and model the research process.  Video can be a great tool to answer some of these questions and provide experiences that will lead to expansion and more inquiry. If you just visited the fire station and your child is buzzing about the experience, finding a video about fire stations encourages further reflection.
   
2.  Preview the content: Always watch videos all the way through to make sure the content and the way it is delivered is developmentally appropriate.  It is important that an adult is guiding young children through this experience by making responsible choices regarding content.  

3.  Watch the video with the child:  This is the tip that can have the greatest impact on increasing the educational value of the experience.  There have been numerous studies finding that children get greater educational benefit from engaging in the use of digital media with someone else.  Talking about the content with someone else increases recall and understanding, co-viewing encourages narration skills, and acquisition of new vocabulary. The Fred Rogers Early Learning Environment is home to an informative video that demonstrates very specific strategies adults can use while watching videos with young children.  Adults are encouraged to treat videos like they would a book by pausing the video, asking questions, commenting, expanding on the child's comments and helping the child make connections. 

4.  Set Limits:  Children need support in establishing and following limits. If needed, use a support such as a timer.      

5.  Keep the learning going, provide extension activities that will help make the learning stick:
     Connect digital and real life experiences: After viewing the video together, turn to an “unplugged” activity to help make the learning stick.  If your child watched a video of a bulldozer leveling dirt, get a bulldozer, head out to the dirt pile or sandbox and give it a try.  If a child watches a video of Mr. Rogers visiting the stage of STOMP, head to the kitchen to see what you and your child can find to make music.  After a child watches a video about boomerangs, challenge him or her to make one with paper and tape, or other materials, then take it outside and see if it works.
     Model other forms of research and inquiry:  Go to the library and find books about bulldozers. Go to the zoo and watch the kangaroos. Visit a local beekeeper and ask questions about bee hives.  
     Create: Now that you have acquired some new learning, create a product that demonstrates that learning.  Documenting and revisiting experiences in a different way will help the new learning stick.  Draw a picture of a bee hive or make a bee hive out of clay. Create a video of the Stomp production in your kitchen and share it with Grandma.  

The next part of the discussion will be where to find educational videos and how to provide the safest experience possible.  Did I miss any strategies?  


Saturday, November 3, 2012

ECSE App All Star: Book Creator

 Recently, I have been asked to make recommendations regarding digital storytelling apps.  I am finally feeling like I have had enough experience with a variety of apps that I can make better informed suggestions. In this post, I will focus on teacher created stories and the app, Book Creator.  Special Education teachers create books for many purposes including social stories, vocabulary development, and targeted literacy instruction. In the past, creating customized books was very time consuming and involved scissors, glue, copying, laminating and binding.  Technology has made this task much less daunting.

The combination of two features, the ability to add audio and the sharing options, make Book Creator a very useful app. Book Creator works well if you are using 1-2 photos per page and need to have audio.  The audio feature is a necessity with young learners who can't read independently.  The sharing options are more extensive than many other digital storytelling apps.  The finished product is an epub file.  If a student is going to be accessing the book on the iPad, the book can be opened in iBooks and the audio remains.  If you need to share the book so it can be accessed on a device other than the iPad on which it was created, you can open the file in Dropbox.  Once I had the file in Dropbox, I pulled it onto my desktop.  I ran into a road block when I tried to open the file on my computer because I didn't have anything installed that could read epub files.  My next step was to  download the Chrome Extension, Readium.  Once the file was in Readium, it opened and the audio remained. You could put the file in a shared folder on Dropbox and make it available to other teachers.  There is also an option to email the file  as an iBook or as a PDF, which would work well for sharing the support with parents.  If a hard copy of the book is needed, there is an option to print.


Book created with Book Creator on iPad, opened in Readium.

I highly recommend Book Creator for the purpose of making materials to support students with special needs.  It is easy enough that it can also be used by young learners to create their own books.  Here are some ideas of instructional materials that could be made using this app:
Preschoolers
Create social stories:  how to stand in line, how to ask a friend to play, how to cope with setbacks.
Create customized books with targeted vocabulary.
Create books to support speech/language goals such as functions, classification, and opposites.
Create visual schedules and sequence boards.
Toddlers/Home based
Create customized books of family members.
Create books with targeted household vocabulary.
Create books with audio from a family member who may not be available to read in person such as a grandparent or a parent in the military.
Create customized books dealing with situations that may create anxiety such as separation from a parent at child care.
Create a book preparing a toddler for a new experience such as a visit to the doctor.
Create a book from the child's point of view about sensory challenges to share with other family members.

Are you special educator using digital storytelling tools to create instructional materials?  What apps have you found useful?  What types of materials are you creating?


Sunday, September 9, 2012

Creating videos with Talking Tom


If you grew up in Minnesota,  you might have visited a small amusement park located in Brainerd called Paul Bunyanland.  I visited the park when I was a preschooler.  While I don't remember any of the rides, I do remember our arrival.  As I walked through the gate, a large statue of Paul Bunyan welcomed me to the park and he knew my name!  This same magic can be created using the app, Talking Tom, and many of the other similar "talking" apps. Young learners find Talking Tom very amusing and motivating, they are very intrigued when Tom uses their name or mentions their class in the video.  Here are some uses of the app in early childhood and special education:
Remind students of rules:  "remember quiet hands and quiet voice at circle time", "to be safe on the playground we go up the stairs and down the slide".
Encourage them to try something new:  Have Talking Tom be a special guest who speaks to the entire class when it is time to try a new food at snack.  Call him Chef Tom and have him encourage everyone to try a taste.
Provide feedback/celebrate success:  "You did it, you were safe on the playground".
Give clues or prompts for a game:  Develop a scavenger hunt related to a concept such as signs of spring and have Tom give the clues, "find something that smells good and grows".

In this example, I use Talking Tom 2 for a rule reminder.  For the students I support, circle time can be a difficult part of the day.  The combination of factors such as close proximity to peers, large quantities of verbal information, and the need to stay in one place for a long period of time, challenge many students who have difficulty with self regulation, auditory processing, and attention issues.   At the beginning of the year, the teacher usually invests a few minutes at the beginning of circle time to remind all of the children of the rules, but toward the middle of the year these group reminders aren't given as frequently.  The adults who support the children with special needs typically need to continue to provide reminders about circle time rules.  We like to provide the reminders immediately before circle time and provide immediate feedback. We know that after so many repetitions our voices can start to sound like the teacher on the Peanuts, "wah, wah, wah"! In an attempt to provide some novelty we created this video with the purpose of reminding a student of the two rules he struggled with on a consistent basis.  The second video was created to  provide feedback and celebrate his success.


To create the video, begin by accessing the Talking Tom settings, found under the iPad settings (the gear icon).  Find the Talking Tom app by scrolling through the apps on the bottom left and select it.

Turn on the longer listening time and user recorded video. Your next step is to script your message, in order to get the "Paul Bunyan effect" make sure you include the student's name or the class name.  I believe the video can be a maximum of 60 seconds.  If you pause and Tom starts to mimic your speech, that is okay, it will not show up on the video, only what you say will be on the video.  When you are ready, tap the video camera icon, located on the left hand side, near the top of the screen.  The icon flashes when it is recording.  Tap the video camera to end the recording.    


A new menu will appear when you end the recording.  If you are not satisfied with the video, tap the X on the top right of the menu and try again.  If you are happy with your product, you have several options for sharing the video.  If you have an account, you can upload the video to You Tube.  The other option is saving it the the iPad in the photo roll by tapping "Photos".  

I have been finding many uses for Tom and his friends.  I use the app with students to encourage sound and word imitation, they enjoy hearing their voice in the video.  If you are allowing a student to use the app, make sure to turn the violence off in the settings, it is found in the same place as the recording options.  Also beware of all of the ads and in app purchase options.  How do you plan to use the video feature of this app with young learners?  


Tuesday, August 14, 2012

Evaluating apps for young learners, my class assignment.


When I am considering the use of a particular form of technology, whether it is a web based game or an app, I look at it from the point of view of an early childhood teacher and a special education teacher.  As part of an assignment for the Technology and Authentic Assessment class I recently completed, I chose to develop a rubric for evaluating educational apps for young children.  I started by brainstorming all of the questions I ask when evaluating the app.  The tricky part was making these questions fit in a crazy rubric and having to come up with different criteria for each consideration.  I am glad that I don’t have to create rubrics on a regular basis, they make my head hurt!  Here is the list of questions I used as a basis for the rubric.   

Is the content (skills, instructions) developmentally appropriate?
I have tried apps that have appropriate content but the instructions were only provided in writing.  Umm, my students can’t read.  Delete app.  

Is the interface (navigation) developmentally appropriate?
I just used an app the other day where the menu button was at the bottom and the child’s wrist kept hitting it, returning to the main menu as a result.  It wasn’t long before her frustration level was elevated and she was ready to try a different app.  The learners I work with need very salient cues for navigation.  The interface can not be too subtle.

Does the learner receive helpful feedback?
Avoid dead silence, annoying clapping and syrupy praise.  Does the app know when a child is stuck and provide an appropriate prompt?  

Does it engage the learner? 
Most of my students have difficulty regulating their attention to a task, so this can be a challenge.  

How many and what type of skills can be targeted? 
I want a lot of bang for the buck or if it covers only a few skills, I expect that it does it very well. I like open ended apps that allow for creation of materials or lessons that can support skills across all domains. 

Does it provide a parent guide or other support for parents? 
Apps that do this get huge bonus points in my book.  I am always looking for apps that will help in building the capacity of parents in supporting their child’s development.  

Does it promote co-engagement (multiplayer, turn taking, etc.)?
Again, this is a big bonus and many times these are the apps I go to first.  

Can the tool be adjusted to the learner's level, challenging but not too frustrating?
Obviously I have students who vary greatly in their developmental needs, therefore I need apps that also vary.  If the learner is stuck, please adjust the task, giving a salient cue, so we don't have a tantrum!  

Can data be collected?
I am a special education teacher, I like data. 

Can a product be created and shared?
A product is data, something I can share with others to demonstrate the child’s progress and learning. Additionally, products created by these creative, curious minds and little hands and voices are adorable and parents love to get them.    

Can this technology promote and support play skills? Physical activities? Social engagement? Problem solving? Reflecting?  Planning?
If an app can help me teach play, pretend, and social skills, I am all for it.  Apps that encourage outdoor exploration, physical activity, problem solving and collaboration are a beautiful thing.  


So taking all these things into consideration, here is a link to the rubric.  I included links on the document to other resources regarding this topic.  This is a draft, I would appreciate feedback that would make this rubric more useful.  If I could fine tune it, maybe our EC staff could use it when selecting apps.  As it stands right now, I think it is way too lengthy to be useful so I might need to whittle it down.  Do you have more questions you consider when selecting apps for young learners?  Were some of the criteria redundant?  Which ones were more important, which ones were less important?  Please leave comments on the Google Doc or comment on this blogpost

ECSE App All Star: Alien Assignment

The Fred Rogers Center developed this scavenger hunt type app and it is one of their best yet. The child is introduced to a cute (non threatening), group of aliens who have a broken ship.  The child is asked to take pictures of objects that can be readily found in the environment in order to help repair the ship.  The aliens describe what is broken, using some great vocabulary concepts in their description.  In some cases, the request is a label such as "find a doorknob" or the request is a related to a concept such as "find something heavy".  The child is asked to take 4 pictures.  The only thing I would change is adding the ability to repeat the prompt because several times the child forgot the prompt as they were walking around the room searching.   


The windshield is broken, find something you can see through.
When the child has taken all of the pictures, he is prompted to give the phone to an adult.  This app gets bonus points for including caregivers in the activity, it is a great app for playing together.  The adult's job is to review the pictures, selecting a thumbs up if the picture matches the request.  If a thumbs down is given, the prompt is repeated and another picture can be taken.   When all of the pictures pass adult inspection, the aliens review the repairs and thank the child for the assistance. This app is useful in Early Childhood Special Education and speech therapy because many of the concepts presented are common targeted concepts in the area of receptive communication skills.  I also appreciate that the app gets kids up and moving, engaging that brain and connecting the real world to the virutal world!  It is also an opportunity to practice recall.  At the end of the activity you can work with the child on recalling  the 4 prompts and pictures. The pictures are not saved to the camera roll so the adult needs to practice some recall skills too.  At the end of the activity you could also do a drawing activity, encouraging the child to draw a picture of one of the objects they photographed, or draw a picture of the aliens.   This app could also be used with parents on home visits.  An early intervention teacher could model the use of this app, demonstrating all of the opportunities it provides for working on a variety of skills. Many thanks to the Fred Rogers Center for this app.  


The compass is broke, help by finding something that points!

Thursday, July 19, 2012

Digital Story created with Strip Designer: Ten Apples Up on Top


My summer days have been filled with sun, lakes, gardening, volleyball and 100 degree days. But, it won’t be long and my thoughts will turn to crisp leaves, cool weather and apples.  Fall is my favorite season in Minnesota.  Mother nature paints the trees with vibrant colors and the trees at the local orchards are brimming with crunchy, crisp apples. In our preschool program, one of the first themes of the year is apples.  The preschool rooms smell like cinnamon and applesauce, students are voting for their favorite apples, and apple art projects decorate the doors and halls.  

One of our favorite books to read during our apple theme is Ten Apples Up on Top, by Dr. Seuss.  My goal for this iPad activity was to create a class counting book based on this book, so I turned to the app, Strip Designer.  Strip Designer is a comic book creating app that is very useful for digital storytelling, social stories and the creation of other visuals.  One of the handy features of this app is the ability to create your own stickers.


Here are screenshots of some sample pages. If you don't want to use real photos, you could use drawings instead.  For the second example, the child created the drawing on Doodle Buddy, saved it to the Photo Album and then I added it to a page.   


Set up:  Take a picture of each child in various poses, check out the book for inspiration.  Make sure to  leave plenty of space between the top of the child's head and the top of the photo.  Find an image of an apple you want to use for the sticker and download it into the Photo Album on the iPad.  

Create the comic book
Step 1: Open the Strip Designer app, choose Create New. Choose a page from the templates.
Step 2:  Add Photos and Text:  Tap Add Photo, choose Photo Album.  Choose a photo of a child.   Tap on text, add text. 
Step 3:  Add pages:  Tap Page (bottom left), then + on the bottom of the left hand sidebar.  This will add a page.  Repeat Step 2 with each child. 

Create the apple sticker
Step 1: Tap Add and a new menu will appear.  Tap Sticker, then Your Stickers.  Tap the +, then choose Photo Album and tap the apple image. 
Step 2: Choose the eraser tool and erase the white background around the apple. You will see a blurred image as you erase. You can resize the eraser tool to make it easier to get close to the edges of the apple. Select Save when the sticker is ready.  


Add sticker/s to page:  
Select the newly added sticker from Your Stickers.  Add the corresponding number of stickers to each page and resize the apple so they will all fit on the student's head.  Have the child drag the apples to the top of his or her head, counting them as they are added. Repeat this process for each child.

Share your final product:
Select Share (top right), preview the pages by tapping the arrow.  To do more editing, tap Back.  If the book is ready, select Share.  There will be several options for sharing.  You can open as a PDF in iBooks, email the PDF or send it to iTunes.  


Additional apple activities:  The blog, Toddlerbrain has some fun ideas for hands on counting and large motor (balancing apples on your head).  Mrs. Nelson's class shares many examples of creative apple activities for Kindergarten.  You Tube has an animated reading of the book, Ten Apples Up On Top. 

This app is easy to navigate.  I was able to create the pages quickly.  I used the app to create more traditional looking comics with some family vacation photos.  It was a unique way to document our summer road trip.  My next use of this app will be to create a class book for Caps for Sale, using some hat stickers.  Any other ideas?


Tuesday, July 3, 2012

Creating an interactive Visual Schedule on the iPad using Pages


I have not purchased a visual schedule app yet.  I know there are many available, I just haven't taken the time to research the apps and make a decision.  Our department uses schedules with many of our students for many different reasons.  We go through a large amount of expensive laminating film and velcro to create the schedules.  As an alternative, my co-worker recently created some schedules for her Interactive White Board. On the IWB, she used a garbage can for the "all done" box and she figured out how to move objects to the front and back so that the schedule pictures can hide behind the trash can.  As she demonstrated this activity, I remembered seeing this same "move to the front" and "move to the back" option while working with the Pages app on the iPad.  I tried this on the iPad using Pages and Keynote, it is a very similar process for both apps. Here is a video demonstration of the process using Pages.


Here is the process in screenshots.  The first two screenshots demonstrate how to add the pictures, create the grid and add the numbers using a text box. To make locating the pictures a little easier,  I created a Schedule Pictures album in my photo album app.  


After all of the pictures are in place, the garbage can needs to be moved to the front and the other pictures need to be moved to the back.  The screenshot above demonstrates how to do this.  First, tap the garbage can, then the paintbrush.  Move the switch to the far right, so the garbage can will be in the front.  Repeat this process with each schedule picture, moving the switch to the far left so that the schedule pictures will be in the back.  Make sure the schedule pictures are smaller than the garbage can so that they can be completely hidden when moved behind the can.

This schedule can be projected during circle time, allowing you to move each item to the garbage can when it is completed.  To move the object, tap on it until the blue box appears, then drag it to the garbage can.  You could also use Pages and the iPad to make a work station schedule, individual student schedule, or a sequence board for dressing and other tasks. Our program uses horizontal schedules, but you could make a vertical schedule by rotating the items.  It takes some practice and patience to become proficient at rotating objects on the iPad, but it can be done!  I am going to continue to post some other ideas for activities using Pages and Keynote, they are very versatile apps. 


Thursday, May 31, 2012

Preschool voting with the iPad

We all scream for ice cream!  Need a way to decide what kind of ice cream to serve at the end of the year preschool party?  Model a great decision making strategy for your class by voting.  Voting provides opportunities to practice many skills. Voting can be an individual or a group lesson.  A child can travel around the school, polling adults, practicing social skills along the way. Skills such as greeting others, initiating interactions and asking questions such as "what is your favorite ice cream?", can be targeted. The entire class can get involved by setting up a polling station so that each child can cast his or her vote.  Higher level thinking skills can be promoted by asking students to predict the results of the poll and compare their prediction with the results.  Counting, one to one correspondence, assigning numerals to sets of numbers and writing numbers are other skills that can be practiced when determining the results of the poll.  The concepts of more, less, many, same, equal, and few, can be emphasized when analyzing the results.  

The iPad can be used as a polling device for your next voting lesson.  In the first example, I used the Pages app to create a template to open in Doodle Buddy.  In the Pages app, I inserted images of two different flavors of ice cream on a blank page and then took a screen shot of the page by pushing the home button and power button at the same time.  I cropped the Pages border out of the picture using the editing features in the Photo app on the iPad.  The next step is to open the Doodle Buddy app and select the tic tac toe icon, then select Photos.  Locate the screenshot on your camera roll and select it.  Tap the chalk icon and choose a color to make your dividing line.  Next, choose the stamp icon and select a stamp for voters to use to indicate their selection.


In the second example, I used Pages to create a template, adding a table to create a basic graph.  

If you do not have the app, Pages, you could make the templates on your computer with another program and then use Dropbox to transfer the template to your iPad.  Another alternative is using the drawing tool in Doodle Buddy to make the template.  You could draw pictures to represent the choices and then draw a grid. Take a screenshot of this template and then open it from the Tic Tac Toe icon. If you want to discuss the results with the group, you can connect the iPad to the projector.  Have fun voting!


Monday, May 7, 2012

Making You Tube more child friendly on the iPad


There are many reasons for using video with young children.  Video can enhance learning and provide visual representations the children may not otherwise be able to experience.  Video is very engaging and motivating to young learners.  The built in You Tube app on the iPad has made accessing You Tube very easy.   Early childhood teachers and parents are sometimes hesitant to use You Tube because there are very few safety features and it seems that everyone has horror stories related to searches gone terribly wrong or inappropriate related videos being displayed.  Even the comments related to each video can be offensive. To address these very valid concerns, I have been working on finding strategies that may lessen a teacher or parent's apprehension in using You Tube.        
Parents and teachers  have the option of disabling You Tube under the Restrictions section of Settings, so that the app can not be used on the iPad.  Here are a few alternatives to restricting the app.   Here are some less drastic alternatives that may make hesitant teachers and parents more comfortable.  To make You Tube more child friendly, parents and teachers should consider creating an account and playlists.  Having an account allows you to subscribe to child friendly channels such as Seasame Street, Yo Gabba Gabba, and the Houston Zoo.  By creating playlists, you are screening and collecting appropriate content for your child or students.  Once you create playlists, they can be accessed through the "favorites" tab on the bottom of the app home screen.  All of your playlists will be listed on the left hand side of the screen after you have selected the "playlists" tab at the top of the screen.  I think the app is more child friendly than the website because when you watch a video on the app, the comments do not appear unless you select the "comment" tab.  The comments are often guilty of being inappropriate.
You Tube playlists on iPad

I have been using the built in You Tube app, but was very excited when I heard about an app that makes You Tube much more child friendly.  The app, iTube Listimports your playlists and when the video is playing there are no comments or related videos.  Children can only see and play videos you have approved.  There is also a feature that can be accessed through the settings which allows an adult to set an alert that acts as a timer, warning a child that his or her time on the app is done.  The app has been "buggy" at times and has quit suddenly.  There are ads in the bottom corner of the play screen if you don't change it to full screen.  At the time of this posting, the app was being offered at no cost. 
iTube list home screen
Weet Woo is another popular You Tube related app.  This app does not allow you to import your playlists.  Instead, the makers of the app, collect kid friendly content.  You can choose an age range in order to access the most appropriate videos.  I often use this app to get ideas for appropriate videos to add to my playlists.   
Our department has also started a collaborative Google Doc.  The purpose of the document is to collect and share early childhood friendly videos that can be added to playlists.  We add videos as hyperlinks so that the person viewing the document can click on the link and be taken directly to the video.  We organize the videos by theme, and other categories such as books, songs, parent education, child development, and flashcards.  

These tips and suggestions are helpful in making You Tube something that parents and teachers are comfortable letting young children access.  Please share any of your helpful tips.    

Monday, April 30, 2012

Click n' Talk and Talk'n Photos Apps


On Saturday, I presented at a wonderful, well organized Autism Resource Fair, sponsored by Autism Allies. I was asked to give a general overview of the iPad and how it may be beneficial for individuals with autism and to highlight some apps. I had a difficult time deciding which apps to highlight in the category of augmentative alternative communication (AAC). This group of apps gets a majority of the press coverage related to individuals with special needs. The obvious choice was Proloquo2go. This app has received a great deal of attention, rightfully so, as it is a well designed, useful app. It comes with a large price tag. Many have pointed out that in comparison to other comparable AAC devices which we're thousands of dollars, $189.00 seems very reasonable. Yet, in the world of apps, this is very steep. I decided to highlight Proloquo2Go and My First AAC which has a more moderate price point of $24.99. As I was preparing the presentation, I received an email from a colleague about two apps that were free for the day. I downloaded them and tried them out. I then added them to the list of AAC apps. I really liked this price, free! Even now that the sale is over, the apps are only $2.99.

The apps are Click n' Talk and Talk'n Photos. They were developed by a school district in Minnesota. The district supported a group of teachers who wanted to develop an app to meet a specific need and the results are wonderful. AAC is only one of many possible uses for these apps. 

In ten minutes, I created a simple communication board for snack time using Talk'n Photos. You can add text and audio to the picture. Each photo is 2x2 which is quite standard. You can use your own photos or import from the web.  The grids are three across and unlimited vertically. I added messages with "I want" along with the name of the food. When you select a message, the screen stays on the grid page.  To leave an album, an arrow at the top is selected. As a communication device, this is an easy, affordable start.


Talk'n Photos Album Page, I created the Snack album, the other two are examples that came with the app.


Talk n' Photo message page.

Talk n' Photos can support many other objectives.  Grids could be created for vocabulary building, language concepts, social stories, sequencing a self help routine and visual schedules.  I hope to share other examples as our staff begins to use the app.


Click n' Talk is a little different from Talk n' Photos in presentation.  The grid is similar but when you select a picture, the selection enlarges to the entire screen, the picture needs to be selected again for the message to play.  Arrows allow you to navigate between photos.  This app may be better suited for social stories and customized books.  I created an art and snack album.  I added numbers to request a quantity for snack. 

Album page, I created an Art and Snack album.  The Milo album is a sample story that came with the app.
Snack Album page, when you select yogurt the next image will appear. 

Here is a link to a video showing a student using Click n' Talk.  I hope to post more examples soon.  Please share how you are using these apps with young learners or learners with special needs.  Thanks!